Tuesday, December 31, 2019


Clone 12C database with another server 12C.
==============================================

references:
https://www.youtube.com/watch?v=QqP7a3_ZDrw&list=PLLoxSRrtzDyDy5ExxR8tFXfdYWhU4e4Gl&index=1

https://www.youtube.com/watch?v=FB6YkK8b8mc&list=PLLoxSRrtzDyDy5ExxR8tFXfdYWhU4e4Gl&index=2

Prerequisite.

* Install same oracle version 11g/12C in new server with software only option.
* make sure to user same paths as existing server for easy configuration. If paths are different it will be complex.

---------------------------------------------------------------------------------

C:\Users\Administrator>ORADIM -NEW -SID TEST -SYSPWD manager
DIM-00019: create service error
O/S-Error: (OS 1073) The specified service already exists.

C:\Users\Administrator>oradim -delete -sid test
Unable to stop service, OS Error = 1062
Instance deleted.

-----------------------------------------------------------

C:\Users\Administrator>ORADIM -NEW -SID TEST -SYSPWD manager
Instance created.

-----------------------------------------------------------

Go to existing database and create pfile and control file trace file
====================================================================

C:\Users\administrator.SMCHO>d:

D:\>sqlplus sys@test as sysdba

SQL> create pfile='\pfileTEST.ora' from spfile;

File created.

SQL> alter database backup controlfile to trace as '\CONTROLFILE.ORA';

Database altered.
-------------------------------------------------------------------

* move new control file and init file in to the new server.
* edit init file according to new SID (if changed) and file paths if changed.

========================================================================

test.__data_transfer_cache_size=0
test.__db_cache_size=18387828736
test.__java_pool_size=469762048
test.__large_pool_size=536870912
test.__oracle_base='D:\app\Administrator'#ORACLE_BASE set from environment
test.__pga_aggregate_target=4294967296
test.__sga_target=21474836480
test.__shared_io_pool_size=536870912
test.__shared_pool_size=1476395008
test.__streams_pool_size=0
*.audit_file_dest='D:\app\Administrator\admin\TEST\adump'
*.audit_trail='db'
*.compatible='12.1.0.0.0'
*.control_files='D:\ORADATA\TEST\CONTROL01.CTL','D:\ORADATA\TEST\CONTROL02.CTL','D:\ORADATA\TEST\CONTROL03.CTL'#Restore Controlfile
*.db_block_size=8192
*.db_cache_size=800m
*.db_domain=''
*.db_name='TEST'#Reset to original value by RMAN
*.diagnostic_dest='D:\app\Administrator'
*.dispatchers='(PROTOCOL=TCP) (SERVICE=TESTXDB)'
*.fixed_date='NONE'
*.java_pool_size=250m
*.job_queue_processes=10
*.large_pool_size=100m
*.nls_language='AMERICAN'
*.nls_length_semantics='CHAR'
*.nls_territory='SRI LANKA'
*.open_cursors=2048
*.optimizer_index_cost_adj=10
*.pga_aggregate_limit=0
*.pga_aggregate_target=4294967296
*.processes=500
*.remote_login_passwordfile='EXCLUSIVE'
*.sga_max_size=21474836480
*.sga_target=21474836480
*.shared_pool_size=800m
*.undo_retention=3600
*.undo_tablespace='UNDOTBS1'

==================================================================

copy below line from trace of control file and create a sql file called create.sql
** make sure to change paths and other parameters if changed from existing.

========================================================================
change below lines

original line => CREATE CONTROLFILE REUSE DATABASE "TEST" NORESETLOGS  NOARCHIVELOG

Edited line =>   CREATE CONTROLFILE SET DATABASE "TEST" RESETLOGS  NOARCHIVELOG

========================================================================

CREATE CONTROLFILE
SET DATABASE "TEST" RESETLOGS  NOARCHIVELOG
    MAXLOGFILES 16
    MAXLOGMEMBERS 3
    MAXDATAFILES 100
    MAXINSTANCES 8
    MAXLOGHISTORY 9348
LOGFILE
  GROUP 1 (
    'D:\ORADATA\TEST\REDO011.LOG',
    'D:\ORADATA\TEST\REDO012.LOG'
  ) SIZE 50M BLOCKSIZE 512,
  GROUP 2 (
    'D:\ORADATA\TEST\REDO021.LOG',
    'D:\ORADATA\TEST\REDO022.LOG'
  ) SIZE 50M BLOCKSIZE 512,
  GROUP 3 (
    'D:\ORADATA\TEST\REDO031.LOG',
    'D:\ORADATA\TEST\REDO032.LOG'
  ) SIZE 50M BLOCKSIZE 512
DATAFILE
  'D:\ORADATA\TEST\SYSTEM01.DBF',
  'D:\ORADATA\TEST\SYSAUX01.DBF',
  'D:\ORADATA\TEST\UNDOTBS01.DBF',
  'D:\ORADATA\TEST\IFSAPP_ARCHIVE_DATA01.DBF',
  'D:\ORADATA\TEST\IFSAPP_ARCHIVE_INDEX01.DBF',
  'D:\ORADATA\TEST\IFSAPP_DATA01.DBF',
  'D:\ORADATA\TEST\IFSAPP_INDEX01.DBF',
  'D:\ORADATA\TEST\IFSAPP_LOB01.DBF',
  'D:\ORADATA\TEST\IFSAPP_REPORT_DATA01.DBF',
  'D:\ORADATA\TEST\IFSAPP_REPORT_INDEX01.DBF',
  'D:\ORADATA\TEST\USERS01.DBF',
  'D:\ORADATA\TEST\IFSAPP_LOB02.DBF',
  'D:\ORADATA\TEST\IFSAPP_DATA02.DBF',
  'D:\ORADATA\TEST\IFSAPP_INDEX02.DBF',
  'D:\ORADATA\TEST\IFSAPP_DATA03.DBF',
  'D:\ORADATA\TEST\IFSAPP_LOB03.DBF',
  'D:\ORADATA\TEST\IFSAPP_LOB04.DBF',
  'D:\ORADATA\TEST\IFSAPP_DATA04.DBF',
  'D:\ORADATA\TEST\IFSAPP_LOB05.DBF',
  'D:\ORADATA\TEST\IFSAPP_LOB06.DBF',
  'D:\ORADATA\TEST\IFSAPP_DATA05.DBF',
  'D:\ORADATA\TEST\IFSAPP_INDEX03.DBF'
CHARACTER SET AL32UTF8
;


========================================================================

-----------------------------------------------------------
SQL> create spfile from pfile='\pfileTEST.ora';

File created.

SQL>
SQL> startup nomount
ORACLE instance started.

Total System Global Area 2.1475E+10 bytes
Fixed Size                  3056960 bytes
Variable Size            2483030720 bytes
Database Buffers         1.8925E+10 bytes
Redo Buffers               64049152 bytes
SQL> @\create.sql;

Control file created.

SQL> alter database open resetlogs;

Database altered.

SQL> select name from v$database;

NAME
---------
TEST

SQL> select name from v$datafile;

NAME
--------------------------------------------------------------------------------
D:\ORADATA\TEST\SYSTEM01.DBF
D:\ORADATA\TEST\SYSAUX01.DBF
D:\ORADATA\TEST\UNDOTBS01.DBF
D:\ORADATA\TEST\IFSAPP_ARCHIVE_DATA01.DBF
D:\ORADATA\TEST\IFSAPP_ARCHIVE_INDEX01.DBF
D:\ORADATA\TEST\IFSAPP_DATA01.DBF
D:\ORADATA\TEST\IFSAPP_INDEX01.DBF
D:\ORADATA\TEST\IFSAPP_LOB01.DBF
D:\ORADATA\TEST\IFSAPP_REPORT_DATA01.DBF
D:\ORADATA\TEST\IFSAPP_REPORT_INDEX01.DBF
D:\ORADATA\TEST\USERS01.DBF

NAME
--------------------------------------------------------------------------------
D:\ORADATA\TEST\IFSAPP_LOB02.DBF
D:\ORADATA\TEST\IFSAPP_DATA02.DBF
D:\ORADATA\TEST\IFSAPP_INDEX02.DBF
D:\ORADATA\TEST\IFSAPP_DATA03.DBF
D:\ORADATA\TEST\IFSAPP_LOB03.DBF
D:\ORADATA\TEST\IFSAPP_LOB04.DBF
D:\ORADATA\TEST\IFSAPP_DATA04.DBF
D:\ORADATA\TEST\IFSAPP_LOB05.DBF
D:\ORADATA\TEST\IFSAPP_LOB06.DBF
D:\ORADATA\TEST\IFSAPP_DATA05.DBF
D:\ORADATA\TEST\IFSAPP_INDEX03.DBF

22 rows selected.


SQL> select member from v$logfile;

MEMBER
--------------------------------------------------------------------------------
D:\ORADATA\TEST\REDO031.LOG
D:\ORADATA\TEST\REDO032.LOG
D:\ORADATA\TEST\REDO021.LOG
D:\ORADATA\TEST\REDO022.LOG
D:\ORADATA\TEST\REDO011.LOG
D:\ORADATA\TEST\REDO012.LOG

6 rows selected.

Add new temp files

SQL>ALTER TABLESPACE TEMP ADD TEMPFILE 'D:\ORADATA\TEST\TEMP01.DBF' SIZE 1G  REUSE AUTOEXTEND ON NEXT 100M  MAXSIZE UNLIMITED;
Deleting an Instance Using ORADIM

Learn how to delete an instance using ORADIM.
To use ORADIM to delete an instance, enter:
oradim -DELETE -SID SID | -ASMSID SID | -SRVC service_name | -ASMSRVC service_name
For this command, note the following:
  • -DELETE indicates that you are deleting an instance or service. This is a mandatory parameter.
  • -SID SID specifies the name of the SID to delete.
  • -SRVC service_name specifies the name of the service to delete (OracleServiceSID). The user must specify either SID or SRVC.
  • -ASMSID SID is the name of the Oracle Automatic Storage Management instance to delete.
  • -ASMSRVC service_name is the name of the Oracle Automatic Storage Management service to delete.
To delete an instance called prod, for example, enter:
C:\> oradim -DELETE -SID prod

Tuesday, December 24, 2019


How to enable SQL markup

SQL> conn /as sysdba (or any user)

SQL> set markup html on spool on

SQL> spool db_info.html

SQL> SET echo on

SQL> select COMP_NAME,VERSION,STATUS from dba_registry;

SQL> show PARAMETER

SQL> select * from v$resource_limit;

SQL> select OWNER,OBJECT_NAME,OBJECT_TYPE from dba_objects where STATUS<>'VALID';

SQL> spool off

SQL> set markup html off

Monday, December 23, 2019


 Best Ways to Find Blocking Sessions in Oracle 11g

Blocking sessions occur when one sessions holds an exclusive lock on an object and doesn’t release it before another sessions wants to update the same data. This will block the second until the first one has done its work. It mainly happens when a session issues an insert, update or delete command that changes a row. When the change occurs, the row is locked until the session either commits the change or rolls the change back.
When a DML is executed (update/delete/insert,merge, and select …. for update) oracle obtains 2 locks on the table. Row level Lock (TX) – This obtains a lock on the particular row being modified and any other transaction attempting to modify the same row gets blocked, till the one already owning it finishes. Table Level Lock (TM) – When Row lock (TX) is obtained an additional Table lock is also obtained to prevent any DDL operations to occur while a DML is in progress. Example: to avoid truncate and alter operation during table modification.
User can modify different rows of the table at the same time but cannot modify the same row at the same time. During row revel lock oracle acquire lock mode 3. Parallel DML operations and serial insert using direct load operations take exclusive table locks with lock mode 6. Below lock mode 6 lock the whole table and during this lock user even can’t modify the rows. This will result in library cache lock. So lock mode 3 is common but avoid using hints during insert because it will lock the whole table.
6   Exclusive (X)              Lock table in exclusive mode
                                         create index    — duration and timing depend on options used
                                          insert /*+ append */
From the view of the user it will look like the application completely hangs while waiting for the first session to release its lock. You’ll often have to identify these sessions in order to improve your application to avoid as many blocking locks as possible.
.You can see where problems might occur, for example a user might make a change and then forget to commit it and leaves for the weekend without logging off the system.
Oracle provide views like, DBA_BLOCKERS and V$LOCK using which we can easily find the blocking locks. Here, we will try to find blocking locks using V$LOCK view which is faster to query and makes it easy to identify the blocking session.
SQL> select * from v$lock ;
ADDR     KADDR           SID TY        ID1        ID2      LMODE    REQUEST    CTIME      BLOCK
——– ——– ———- — ———- ———- ———- ———- ———- ————————————-
AF8E2C4C AF9E2C50      419 TX     141028      15289      0              6                    675          0
ADDF7EC8 ADDF8EE0    542 TM    77529          0            3              0                    687          0
ADDF7F74 ADDF7F8C     419 TM    77529          0            3              0                    675          0
ADEBEA20 ADEBEB4C   542 TX     141028     152899     6             0                    687          1
Here we are interested in the BLOCK column. If a session holds a lock that’s blocking another session, BLOCK=1. Further, you can tell which session is being blocked by comparing the values in ID1 and ID2. The blocked session will have the same values in ID1 and ID2 as the blocking session, and, since it is requesting a lock it’s unable to get, it will have REQUEST > 0.
In the query above, we can see that SID 542 is blocking SID 419. SID 542 corresponds to Session 1 in our example, and SID 419 is our blocked Session 2. To avoid having to stare at the table and cross-compare ID1’s and ID2’s, put this in a query:
 Query to find Blocking sessions using v$lock
SQL> select l1.inst_id,l1.sid, ' IS BLOCKING ' l2.sid,l1.type,l2.type,l1.lmode,l2.lmode,l2.inst_id
from gv$lock l1, gv$lock l2
where l1.block =1 and l2.request > 0
and l1.id1=l2.id1
and l1.id2=l2.id2;
To Get Detailed information on blocking locks

SQL> SELECT 'Instance '||s1.INST_ID||' '|| s1.username || '@' || s1.machine
   || ' ( SID=’ || s1.sid || ','|| s1.serial#||s1.status||  '  )  is blocking ‘
   || s2.username || '@' || s2.machine || ' ( SID=' || s2.sid || ' ) ' ||s2.sql_id
    FROM gv$lock l1, gv$session s1, gv$lock l2, gv$session s2
   WHERE s1.sid=l1.sid AND
    s1.inst_id=l1.inst_id AND
    s2.sid=l2.sid AND
    s2.inst_id=l2.inst_id AND
    l1.BLOCK=1 AND
   l2.request > 0 AND
   l1.id1 = l2.id1 AND
   l2.id2 = l2.id2 ;
-----------------------------------------------------------------------------------------------------------------

Here is a query that gives us a list of blocking sessions and the sessions that they are blocking:
select
   blocking_session,
   sid,
   serial#,
   wait_class,
   seconds_in_wait
from
   v$session
where
   blocking_session is not NULL
order by
   blocking_session;

 
BLOCKING_SESSION        SID    SERIAL# WAIT_CLASS           SECONDS_IN_WAIT
---------------- ---------- ---------- -------------------- --------
             148        135      61521 Idle                              64

==================================================================================================
Finding blocking sessions with v$session
set lines 1234 pages 9999
col inst_id for a10
col serial# for a10
col machine for a30
col username for a10
col event for a20
col blocking_session for 999999
col blocking_instance for 999999
col status for a10
col INST_ID for 9999
col SERIAL# for 999999
SQL> select inst_id,sid,serial#, machine, username, event, blocking_session, blocking_instance, status, sql_id from gv$session where status ='ACTIVE'and username is not null;
Finding SQL_ID from SID using v$session
SQL> select sql_id from v$session where sid=4120;
SQL_ID
————-
SQL> select sql_fulltext from v$sql where sql_id ='xxxxx';
Killing Oracle Sessions
Be very careful when identifying the session to be killed. If you kill a session belonging to a background process you will cause an instance crash.
There are a number of ways to kill blocking sessions both from Oracle sql prompt and externally.
Identify the Session to be Killed
ALTER SYSTEM KILL SESSION
ALTER SYSTEM DISCONNECT SESSION
The Windows Approach
The UNIX Approach
SQL> ALTER SYSTEM KILL SESSION 'sid,serial#' IMMEDIATE;

This does not affect the work performed by the command, but it returns control back to the current session immediately, rather than waiting for confirmation of the kill.
In a RAC environment, you optionally specify the INST_ID, shown when querying the GV$SESSION view. This allows you to kill a session on different RAC node.
SQL> ALTER SYSTEM KILL SESSION 'sid,serial#,@inst_id';
SQL> ALTER SYSTEM DISCONNECT SESSION 'SID,SERIAL#' IMMEDIATE;
The DISCONNECT SESSION command kills the dedicated server process, which is equivalent to killing the server process from the operating system
kill -9 spid
 To identifying blocked objects

The view v$lock we’ve already used in the queries above exposes even more information. There are differnet kind of locks – check this site for a complete list: http://download.oracle.com/docs/cd/B13789_01/server.101/b10755/dynviews_1123.htm#sthref3198
If you encounter a TM lock is means that two sessions are trying to modify some data but blocking each other. Unless one sessions finished (commit or rollback), you’ll never have to wait forever.
The following queries shows you all the TM locks:
SELECT sid, id1 FROM v$lock WHERE TYPE='TM';

SID ID1
92 20127
51 20127
The ID you get from this query refers to the actual database object which can help you to identify the problem, look at the next query:
SELECT object_name FROM dba_objects WHERE object_id=20127
These queries should help you to identify the cause of your blocking sessions!

Thursday, December 19, 2019


ora 27104 system defined limits for shared memory was misconfigured linux


[root@oracledb ~]# cat /etc/sysctl.conf | grep kernel | grep shm | grep -v "#"


Your kernel parameters need modifying.
Edit /etc/sysctl.conf and ensure the following lines are present:
kernel.shmall = 18350080
kernel.shmmax = 75161927680
kernel.shmmni = 4096
kernel.sem = 250 32000 100 128
Then reboot the machine.

Temp File issue :- ORA-01187: cannot read from file because it failed verification tests


How to Create TEMPORARY tablespace and drop existing temporary tablespace in oracle 11g

In this article, I will explain you the step by step guide to create new TEMP tablespace and drop existing temporary tablespace.

While doing this activity, existing temporary tablespace may have existing live sessions, due to same oracle won’t let us to drop existing temporary tablespace. Resulting, we need to kill existing session before dropping temporary tablespace.

Following query will give you tablespace name and datafile name along with path of that data file.

SQL> select FILE_NAME,TABLESPACE_NAME from dba_temp_files;

Following query will create temp tablespace named: ‘TEMP_NEW’ with 500 MB size along with auto-extend and maxsize unlimited.

SQL> CREATE TEMPORARY TABLESPACE TEMP_NEW TEMPFILE '/DATA/database/ifsprod/temp_01.dbf' SIZE 500m autoextend on next 10m maxsize unlimited;

Following query will help you to alter database for default temporary tablespace. ( i.e. Newly created temp tablespce: ‘TEMP_NEW’ )

SQL> ALTER DATABASE DEFAULT TEMPORARY TABLESPACE TEMP_NEW;

Retrieve ‘SID_NUMBER’ & ‘SERIAL#NUMBER’ of existing live session’s who are using old temporary tablespace ( i.e. TEMP ) and kill them.

SQL> SELECT b.tablespace,b.segfile#,b.segblk#,b.blocks,a.sid,a.serial#,
a.username,a.osuser, a.status
FROM v$session a,v$sort_usage b
WHERE a.saddr = b.session_addr;


Provide above inputs to following query, and kill session’s.

SQL> alter system kill session 'SID_NUMBER, SERIAL#NUMBER';

For example:

SQL> alter system kill session '59,57391';

Now, we can drop old temporary tablespace without any trouble with following:

SQL> DROP TABLESPACE old_temp_tablespace including contents and datafiles;

Tuesday, December 17, 2019

Enterprise Manager Database Express in Database 12c Release 1

Introduction

Key things to remember about Enterprise Manager Database Express.
  • EM DB Express is not Cloud Control or Grid Control!
  • EM DB Express is not a replacement for the DB Control from 11g, as it has significantly less functionality.
  • A DBA will not be able to administer the database using just EM DB Express.
If your organisation uses Cloud Control, which it should, you will probably never use EM Database Express. If on the other hand you are playing around with the database and want a pretty interface to perform some tasks, the EM Database Express might be your answer.

Configuration

If you've done the sort of database installations described here, you've probably already got EM Database Express configured. Unlike the DB Control, it runs from inside the database using the XML DB infrastructure, so there are no additional parts to install or executables to start.
To get up and running, you just need to check the HTTPS port is set for the XML DB.
SQL> SELECT DBMS_XDB_CONFIG.gethttpport FROM dual;

GETHTTPPORT
-----------
          0

SQL> SELECT DBMS_XDB_CONFIG.gethttpsport FROM dual;

GETHTTPSPORT
------------
        5500

SQL> EXEC DBMS_XDB_CONFIG.sethttpsport(5500);

PL/SQL procedure successfully completed.

SQL>
Once that is done, EM Database Express is accessible using the following type of URL.
https://<hostname>:<port>/em/

Example:

https://ol6-121.localdomain:5500/em/

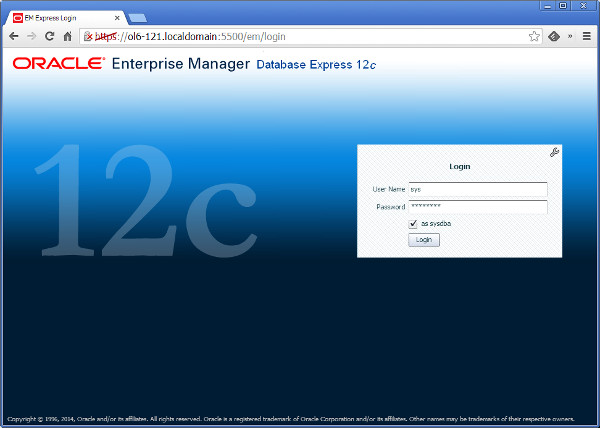
Enter your database login details and click the "Login" button.
Enterprise Manager Database Express 12c : Login
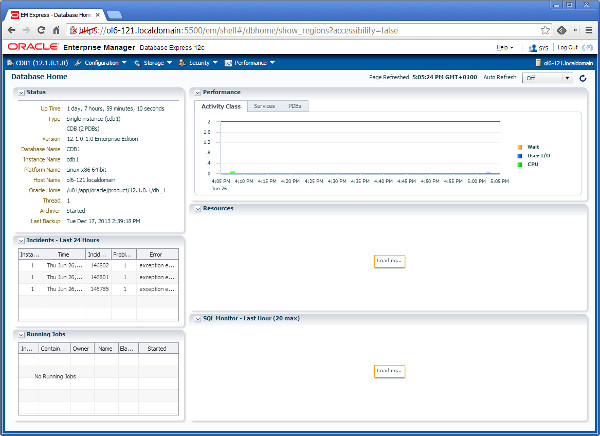
You are presented with the home page for the database.
Enterprise Manager Database Express 12c : Home

Usage

The menu structure for DB Express is quite simple.
Configuration
  - Initialization Parameters
  - Memory
  - Database Feature Usage
  - Current Database Properties

Storage
  - Undo Management
  - Redo Log Groups
  - Archive Logs
  - Control Files

Security
  - Users
  - Roles

Performance
  - Performance Hub
  - SQL Tuning Advisor
You will notice, there is very little in the way of administration screens. This is not a tool a DBA will use to administer the database.
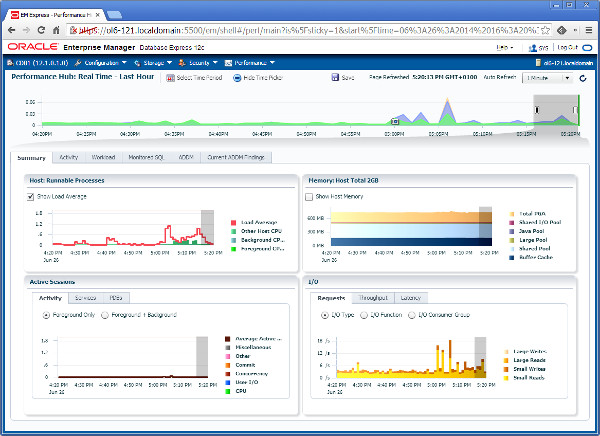
Most of the screens are self explanatory. The only really interesting screen is the Performance Hub, which actually looks nicer than the Cloud Control equivalent.
Enterprise Manager Database Express 12c : Performance Hub

Monday, December 16, 2019


OSWbb – How To Install And Configure OSWatcher Black Box For System Diagnostics
System troubleshooting is the major task for admin in day to day activities.
System admins are facing difficulties to identify system performance issue on Linux.
They can not able to figure it out what actually causing the issue. It is very hard to find the root cause.
There are many tools available in Linux to identify system performance issue but each tool (like top, vmstat, ps, iostat, etc) has it own features and we can’t get all in one place to identify the root causes.
Few tools are available in Linux to get all these details in one place. We already covered such kind of topic in past called sosreport.
What Is OSWatcher (OSWbb)
Oracle OSWatcher Black Box (OSWbb) collects and archives operating system and network metrics that you can use to diagnose performance issues. It’s a set of shell scripts OSWbb operates as a set of background processes on the server and gathers data on a regular basis, invoking below Unix utilities.
Make sure the blow packages should be installed on your system as prerequisites. If no, install missing packages using distribution package manager.
§  VMSTAT
§  IOSTAT
§  MPSTAT
§  IFCONFIG
§  NETSTAT
§  TOP
§  TRACEROUTE
oswbb is comprised of two separate components:
§  oswbb: a unix shell script data collector which collects and stores the data.
§  oswbba: a java utility which will analyze the data automatically and provide advice and produce graphs and an html document.
How To Install OSWatcher (OSWbb) In Linux
This is straight forward. Just download the latest available package version from oracle website and extract to descried location.
§  Log on to My Oracle Support (MOS) at http://support.oracle.com
Move/Copy the file to the directory where you want to install OSWbb and extract the file.
# tar xvf oswbb812.tar
It creates a directory called oswbb, which contains all the directories and files that are associated with OSWbb.
# ls -lh /opt/oswbb
total 516K
drwx------  2 oracle oinstall 4.0K Sep  6  2017 analysis
drwx------ 13 oracle oinstall 4.0K Mar  1 18:03 archive
drwx------ 13 oracle oinstall 4.0K Oct 20 13:49 archive-old
-rwxr-xr-x  1 oracle oinstall   67 Jan 15  2014 call_du.sh
-rwxr-xr-x  1 oracle oinstall   68 Oct  7  2013 call_sar.sh
-rwxr-xr-x  1 oracle oinstall   71 Jan  7  2014 call_uptime.sh
drwx------  2 oracle oinstall 4.0K May  2  2017 data
drwx------  4 oracle oinstall 4.0K Sep  5  2017 docs
-rwxr-xr-x  1 oracle oinstall  665 Feb  6  2017 Example_extras.txt
-rwxr-xr-x  1 oracle oinstall 1.9K Oct  7  2013 Exampleprivate.net
-rwxr-xr-x  1 oracle oinstall 3.9K Apr 17  2017 genprvnet.sh
drwx------  2 oracle oinstall 4.0K Sep  6  2017 gif
-rwxr-xr-x  1 oracle oinstall  772 May  8  2014 ifconfigsub.sh
-rwxr-xr-x  1 oracle oinstall  743 Oct  7  2013 iosub.sh
drwx------  2 root   root     4.0K Mar 16 19:59 locks
-rwxr-xr-x  1 oracle oinstall 1.5K Jan  8  2014 ltop.sh
-rwxr-xr-x  1 oracle oinstall  542 Oct  7  2013 mpsub.sh
-rwxr-xr-x  1 oracle oinstall  740 Oct  7  2013 nfssub.sh
-rwxr-xr-x  1 oracle oinstall 6.7K Jul 12  2017 OSWatcherFM.sh
-rwxr-xr-x  1 oracle oinstall  47K Aug 14  2017 OSWatcher.sh
-rw-r--r--  1 oracle oinstall  10K Sep  6  2017 oswbb810.tar
-rwxr-xr-x  1 oracle oinstall 310K Sep  6  2017 oswbba.jar
-rwxr-xr-x  1 oracle oinstall  414 Oct  7  2013 oswib.sh
-rwxr-xr-x  1 oracle oinstall  435 Jan  8  2014 oswnet.sh
-rwxr-xr-x  1 oracle oinstall  825 Oct  7  2013 oswrds.sh
-rwxr-xr-x  1 oracle oinstall  524 Oct  7  2013 oswsub.sh
-rwxr-xr-x  1 oracle oinstall 1.5K Aug 24  2017 psmemsub.sh
-rwxr-xr-x  1 oracle oinstall  557 Jul 12  2017 sarsub.sh
drwx------  7 oracle oinstall 4.0K Sep  6  2017 src
-rwxr-xr-x  1 oracle oinstall 2.6K Feb 26  2015 startOSWbb.sh
-rwxr-xr-x  1 oracle oinstall  751 Aug 14  2017 stopOSWbb.sh
-rwxr-xr-x  1 oracle oinstall  834 Feb  6  2017 tar_up_full_archive.sh
-rwxr-xr-x  1 oracle oinstall 5.3K Feb  6  2017 tar_up_partial_archive.sh
drwx------  2 root   root     4.0K Mar 16 19:59 tmp
-rwxr-xr-x  1 oracle oinstall  527 Feb  7  2017 topaix.sh
-rwxr-xr-x  1 oracle oinstall  545 Feb 23  2015 vmsub.sh
-rwxr-xr-x  1 oracle oinstall 1.5K Feb 26  2015 xtop.sh
To start OSWbb, run the startOSWbb.sh script from the oswbb directory. This script accepts two parameters, which is Frequency & Duration.
§  Frequency : How frequent (in seconds) data needs to be collected.
§  Duration : How many hours data needs to be archived
If you do not input any arguments, the script runs with default values of 30 and 48. It collects data every 30 seconds and store the last 48 hours of data in archive files.
# ./startOSWbb.sh [Frequency Duration]
The below example collects and stores the last 10 hours of data to archive files at 60 second intervals.
# ./startOSWbb.sh 60 10
Setting the archive log directory to/opt/oswbb/archive

Testing for discovery of OS Utilities...
VMSTAT found on your system.
IOSTAT found on your system.
MPSTAT found on your system.
IFCONFIG found on your system.
NETSTAT found on your system.
TOP found on your system.
TRACEROUTE found on your system.

Discovery of CPU CORE COUNT
CPU CORE COUNT will be used by oswbba to automatically look for cpu problems

CPU CORE COUNT = 6
VCPUS/THREADS = 24

Discovery completed.

Starting OSWatcher v8.1.0  on Tue Feb 27 15:14:54 MST 2018
With SnapshotInterval = 60
With ArchiveInterval = 10

OSWatcher - Written by Carl Davis, Center of Expertise,
Oracle Corporation
For questions on install/usage please go to MOS (Note:301137.1)
If you need further assistance or have comments or enhancement
requests you can email me Carl.Davis@Oracle.com

Data is stored in directory: /opt/oswbb/archive

Starting Data Collection...

oswbb heartbeat:Tue Feb 27 15:14:59 MST 2018
oswbb heartbeat:Tue Feb 27 15:15:59 MST 2018
oswbb heartbeat:Tue Feb 27 15:17:00 MST 2018
oswbb heartbeat:Tue Feb 27 15:18:00 MST 2018
oswbb heartbeat:Tue Feb 27 15:19:00 MST 2018
oswbb heartbeat:Tue Feb 27 15:20:00 MST 2018
oswbb heartbeat:Tue Feb 27 15:21:00 MST 2018
oswbb heartbeat:Tue Feb 27 15:22:00 MST 2018
.
.
To stop OSWbb prematurely, run the stopOSWbb.sh script from the oswbb directory.
# ./stopOSWbb.sh
How To View The Collected Data
Collected data will be stored under archive directory, it is created when OSWbb is started for the first time. OSWbb stores data in hourly archive files named system_name_utility_name_timestamp.dat, and each entry in a file is preceded by the characters *** and a timestamp.
# ls -lh /opt/oswbb/archive
total 44K
drwx------ 2 root root 4.0K Mar  1 18:06 oswcpuinfo
drwx------ 2 root root 4.0K Mar 16 19:01 oswifconfig
drwx------ 2 root root 4.0K Mar 16 19:01 oswiostat
drwx------ 2 root root 4.0K Mar 16 19:01 oswmeminfo
drwx------ 2 root root 4.0K Mar 16 19:01 oswmpstat
drwx------ 2 root root 4.0K Mar 16 19:01 oswnetstat
drwx------ 2 root root 4.0K Mar  1 18:03 oswprvtnet
drwx------ 2 root root 4.0K Mar 16 19:01 oswps
drwx------ 2 root root 4.0K Mar 16 19:01 oswslabinfo
drwx------ 2 root root 4.0K Mar 16 19:01 oswtop
drwx------ 2 root root 4.0K Mar 16 19:01 oswvmstat
To check any data, just navigate to corresponding directory and view the corresponding file. For testing purpose, we printed vmstat file output.
# more oracle.2daygeek.com_vmstat_18.02.28.2300.dat
Linux OSWbb v8.1.0 oracle.2daygeek.com
SNAP_INTERVAL 60
CPU_CORES 6
VCPUS 24
OSWBB_ARCHIVE_DEST /opt/oswbb/archive
zzz ***Wed Feb 28 23:00:09 MST 2018
procs -----------memory---------- ---swap-- -----io---- --system-- -----cpu-----
r  b   swpd   free   buff  cache   si   so    bi    bo   in   cs us sy id wa st
3 23 18027636 873140  11044 477948  101  138  5013  1964   93   13 14  2 67 17  0
2 17 18052168 878900  11044 481844 7636 24704 88672 58333 28214 41906  6  4 59 31  0
2 16 18065140 873880  11580 486796 5692 13868 71832 81249 27917 42840  8  3 61 29  0
zzz ***Wed Feb 28 23:01:09 MST 2018
procs -----------memory---------- ---swap-- -----io---- --system-- -----cpu-----
r  b   swpd   free   buff  cache   si   so    bi    bo   in   cs us sy id wa st
3 21 18481600 868868  10896 507336  102  138  5037  1966   96   19 14  2 67 17  0
5 12 18495272 880956  10884 502060 3472 14188 296964 76683 25768 44284  6  3 61 30  0
2 13 18495680 874532  11000 504336 4620 1532 215072 43823 22749 40949  6  2 64 29  0
zzz ***Wed Feb 28 23:02:09 MST 2018
procs -----------memory---------- ---swap-- -----io---- --system-- -----cpu-----
r  b   swpd   free   buff  cache   si   so    bi    bo   in   cs us sy id wa st
7 21 18840580 866384  10756 479816  102  139  5054  1967    0   25 14  2 67 17  0
5 10 18845460 870052  10868 483252 5624 5696 191656 75508 24249 42834  7  3 60 31  0
2  9 18855152 881676  10844 478320 5620 10556 248988 22601 21635 37511  5  2 66 28  0
zzz ***Wed Feb 28 23:03:10 MST 2018
procs -----------memory---------- ---swap-- -----io---- --system-- -----cpu-----
r  b   swpd   free   buff  cache   si   so    bi    bo   in   cs us sy id wa st
8 12 15170720 1074652  18680 489808  103  139  5068  1967    3   31 14  2 67 17  0
2 11 15169920 1055024  19356 500372 5868    0 185516 202669 24888 45625  5  2 67 27  0
2 16 15169420 1037896  19640 509260 3944    0 99680 268204 25285 45869  4  2 67 27  0
zzz ***Wed Feb 28 23:04:10 MST 2018
procs -----------memory---------- ---swap-- -----io---- --system-- -----cpu-----
r  b   swpd   free   buff  cache   si   so    bi    bo   in   cs us sy id wa st
8  8 15347816 879160   7268 595280  103  139  5058  1973    7   36 14  2 67 17  0
5  5 15346984 865644   7536 602356 6164    0 51172 52905 24542 39722 14  1 67 18  0
--More--(8%)
OSWatcher Analyzer
oswbba is a graphing and analysis utility which comes bundled with OSWatcher. This allows the user to graph and analyze data collected from running OSWatcher. Analyzing this data automatically avoids the time consuming task of manually inspecting all the files that OSWatcher collects. This utility is a stand-alone java program which requires java to be installed.
# java -jar oswbba.jar -i /opt/oswbb/archive/

Starting OSW Analyzer V8.1.2
OSWatcher Analyzer Written by Oracle Center of Expertise
Copyright (c)  2017 by Oracle Corporation

Parsing Data. Please Wait...

Scanning file headers for version and platform info...

Parsing file oracle.2daygeek.com_iostat_18.04.19.0300.dat ...
Parsing file oracle.2daygeek.com_iostat_18.04.19.0400.dat ...
This directory already exists. Rewriting...

Parsing file oracle.2daygeek.com_vmstat_18.04.19.0300.dat ...
Parsing file oracle.2daygeek.com_vmstat_18.04.19.0400.dat ...


Parsing file oracle.2daygeek.com_netstat_18.04.19.0300.dat ...
Parsing file oracle.2daygeek.com_netstat_18.04.19.0400.dat ...

Parsing file oracle.2daygeek.com_top_18.04.19.0300.dat ...
Parsing file oracle.2daygeek.com_top_18.04.19.0400.dat ...

Parsing file oracle.2daygeek.com_ps_18.04.19.0300.dat ...
Parsing file oracle.2daygeek.com_ps_18.04.19.0400.dat ...


Parsing Completed.


Enter 1 to Display CPU Process Queue Graphs
Enter 2 to Display CPU Utilization Graphs
Enter 3 to Display CPU Other Graphs
Enter 4 to Display Memory Graphs
Enter 5 to Display Disk IO Graphs

Enter GC to Generate All CPU Gif Files
Enter GM to Generate All Memory Gif Files
Enter GD to Generate All Disk Gif Files
Enter GN to Generate All Network Gif Files

Enter L to Specify Alternate Location of Gif Directory
Enter Z to Zoom Graph Time Scale (Does not change analysis dataset)
Enter B to Returns to Baseline Graph Time Scale (Does not change analysis dataset)
Enter R to Remove Currently Displayed Graphs

Enter X to Export Parsed Data to Flat File
Enter S to Analyze Subset of Data(Changes analysis dataset including graph time scale)
Enter A to Analyze Data
Enter D to Generate DashBoard

Enter Q to Quit Program

Please Select an Option:


  RMAN-20207: UNTIL TIME or RECOVERY WINDOW is before RESETLOGS time https://shivanandarao-oracle.com/2012/12/05/rman-20207-until-time-or-re...