Sunday, November 12, 2017


ORA-28001: the password has expired

sqlplus /nolog 

SQL> connect / as SYSDBA 

Connected.

--------------------------------------------------------------------------------------------------------------------------

check "PASSWORD_LIFE_TIME" by

Sql > select * from dba_profiles;

Set to Never expire

Sql> ALTER PROFILE DEFAULT LIMIT PASSWORD_LIFE_TIME UNLIMITED;

Then reset the password of locked user

Sql> alter user myuser identified by mynewpassword account unlock;

--------------------------------------------------------------------------------------------------------------------------


Friday, November 10, 2017


ORA-03113: end-of-file on communication channel

[root@testwms orawms]# ps -ef |grep smon
orawms    6818     1  0 15:49 ?        00:00:00 ora_smon_AAD
oradev    6930     1  0 Oct19 ?        00:03:09 ora_smon_ADV
oradev    7500     1  0 Oct19 ?        00:02:08 ora_smon_AAD4
root      8068  3227  0 15:55 pts/2    00:00:00 grep smon
orawms    9300     1  0 Oct19 ?        00:03:13 ora_smon_AAD3


Case:

While trying to open db 11g on linux machine we encounter the error ORA-03113: end-of-file on communication channel.


Investigation and solution:

Returning back to the alert log file we can see the following lines:

*************************************************************************************

ORA-19815: WARNING: db_recovery_file_dest_size of 5368709120 bytes is 100.00% used, and has 0 remaining bytes available.

************************************************************************

You have following choices to free up space from recovery area:

1. Consider changing RMAN RETENTION POLICY. If you are using Data Guard,

then consider changing RMAN ARCHIVELOG DELETION POLICY.

2. Back up files to tertiary device such as tape using RMAN

BACKUP RECOVERY AREA command.

3. Add disk space and increase db_recovery_file_dest_size parameter to

reflect the new space.

4. Delete unnecessary files using RMAN DELETE command. If an operating

system command was used to delete files, then use RMAN CROSSCHECK and

DELETE EXPIRED commands.

************************************************************************

Errors in file /u01/app/oracle/diag/rdbms/mostprod/mostprod/trace/mostprod_ora_11853.trc:

ORA-19809: limit exceeded for recovery files

ORA-19804: cannot reclaim 42960384 bytes disk space from 5368709120 limit

ARCH: Error 19809 Creating archive log file to ‘/u01/flash_rec_area/MOSTPROD/archivelog/2012_11_21/o1_mf_1_177_%u_.arc’

Errors in file /u01/app/oracle/diag/rdbms/mostprod/mostprod/trace/mostprod_ora_11853.trc:

ORA-16038: log 3 sequence# 177 cannot be archived

ORA-19809: limit exceeded for recovery files

ORA-00312: online log 3 thread 1: ‘/u01/app/oracle/oradata/mostprod/redo03.log’

*************************************************************************************

As you can see the probles is regarding the archive log area is ran out of space.

To solve this issue:
We can follow any of the given suggestions but what we do in our case is to archive some old archived logs and delete then from the archive log area.
Optionally you may change the archive log retention policy to a suitable period of time.
As we remove the archived log files through the OS command we need to tell the database about what we did that is using rman otherwise the database will still failed to open. So…

SQL> startup — Failed to startup, the same ORA-03113 Error

SQL> startup nomount — ORACLE Instance Started

SQL> alter database mount — Database altered

SQL> exit

$ cd $ORACLE_HOME/bin

$ ./rman target /

RMAN> crosscheck archivelog all — Here you will see all the names of archivelogs still exist

RMAN> delete expired archivelog all

RMAN> exit

$ sqlplus / as sysdba

SQL> alter database open — Database altered

Thursday, November 9, 2017


Auto config in Oracle Apps R12 adautocfg.sh


Autoconfig is tool/utility to reconfigure your Oracle Application configuration files using context (XML file) and template files, more information here and here

This post covers steps to run Autoconfig in Oracle Apps R12 (steps are similar to 11i, only change is location of autoconfig script and log files)

.

A) Running Autoconfig on R12 environment Application Tier

1. Login as user owning application tierfor R12 (usually applmgr)

2. Set environment variable by executing env file $INSTALL_BASE/ apps/ apps_st/ appl/ APPL[$SID]_[$hostname].env

3. cd $ADMIN_SCRIPTS_HOME (or $INSTALL_BASE/apps/$CONTEXT_NAME/ admin/ scripts)

4. run adautocfg.sh (Autoconfig script)
 ./adautocfg.sh or sh adautocfg.sh  provide apps password when prompted.
.
B) Running Autoconfig on R12 environment Database Tier

1.Login as user owning database tier for R12 (usually oracle)

2. Set environment variable by executing env file $INSTALL_BASE/ db/ tech_st/ [11.1.0 or 10.2.0]/ [$SID]_[$hostname].env

3. cd $ORACLE_HOME/ appsutil/ scripts/ $CONTEXT_NAME

4. run adautocfg.sh (Autoconfig script)
./adautocfg.sh or sh adautocfg.sh

5. Provide apps password when prompted

Things good to know about Autoconfig in R12
1. Autoconfig logs for R12 application tier are at

$INSTALL_BASE/inst/apps/$CONTEXT_NAME/admin/log/$MMDDHHMM/adconfig.log ($INST_TOP/admin/log/[$MMDDhhmm])

2. Autoconfig logs for R12 Database tier are at[$RDBMS_ORACLE_HOME]/appsutil/log/[$CONTEXT_NAME]/[$MMDDhhmm]/adconfig.log


3. R12 system is autoconfig enabled and uses context file stored in [INST_TOP]/appl/admin/[CONTEXT_NAME].xml (Application Tier)
and
[$DATABASR_ORACLE_HOME]/appsutil/[$CONTEXT_NAME].xml (Database Tier)


Related
387859.1 Using AutoConfig to Manage System Configurations in Oracle E-Business Suite Release 12

Thursday, November 2, 2017


Oracle 11gR - 11.2.0.2 to 11.2.0.4 upgrade steps

* yum install oracle-rdbms-server-11gR2-preinstall


Download the ‘patch’ software

Currently, the Oracle Database 11.2.0.4 files are not available to download from the usual Oracle Technology Network (OTN) area, instead you have to log into My Oracle Support (MOS)and search for patch number ‘13390677’. It’s probably worth mentioning at this point, that the ‘patch’ is a full install, despite the reference – so you don’t need to download Oracle Database 11.2.0.2 files in addition here

Once you’ve searched for the ‘patch’, select the link appropriate to your platform, in this case ‘Linux x86-64’. When you click download, there will be a total of 7 zip files available. For a standard installation, you only need zip parts 1 and 2…

  • p13390677_112040_platform_1of7.zip (Oracle Database, including Oracle RAC components)
  • p13390677_112040_platform_2of7.zip (Oracle Database, including Oracle RAC components)
Once you’ve downloaded the software, unzip both files to a staging area:

unzip /tmp/p13390677_112040_Linux-x86-64_1of7.zip -d /u01/app/oracle/software
unzip /tmp/p13390677_112040_Linux-x86-64_2of7.zip -d /u01/app/oracle/software

All of the contents from the above will be extracted to a “database” directory.
Start the installer

Open an X-Windows session to the server as the ‘oracle’ user.

Once you’ve met the requirements, and have unzipped the software, you can start the install:


Upgrade DB using DBUA


Update environment settings

Once the installation has finished, add the appropriate environment variables to your ‘oracle’ user profile.


Wednesday, November 1, 2017


How to find Oracle EBS Weblogic Server Admin Port Number and URL

Web Logic Server Admin Port  

 Method 1:

Open the EBS domain config file in following location.
$EBS_DOMAIN_HOME/config/config.xml

Then check for Admin Server Port.

Method 2:

Open the application tier context file
$CONTEXT_FILE

Then check the value of variable "s_wls_adminport" in the for the correct Web Logic Server Admin port number

Web Logic Server Console URL 

http://<server name>. <domain name> : < WLS Admin Port>/console
For example. http://oracle.test.com:7003/console

ORA-02020: Too Many Database Links In Use


PROBLEM:

While querying against a database link, got below error.

select sysdate from dual@DB5


ERROR at line 1:

ORA-02020: too many database links in use

CAUSE & SOLUTION:
open_links parameter control, the number of database links each session can use without closing it.
If you access a database link in a session, then the link remains open until you close the session.


SQL> show parameter open_link

NAME TYPE VALUE
------------------------------------ ----------- ------------------------------
open_links integer 4
open_links_per_instance integer 4


Here open_links is set to 4, i.e a session can access only 4 open database links in that session.When the open db_link connection reaches the limit(open_links), it throws ORA-02020: too many database links in use.
Solution:


1. Close the open db_link connections

2. Increase the open_links parameter (bounce required)


Let’s reproduce this error.


SQL> select sysdate from dual@DB1;


SYSDATE
---------
30-JUL-17


SQL> select sysdate from dual@DB2;

SYSDATE
---------
30-JUL-17

SQL> select sysdate from dual@DB3;

SYSDATE
---------
30-JUL-17

SQL> select sysdate from dual@DB4;

SYSDATE
---------
30-JUL-17

SQL> select sysdate from dual@DB5;


select sysdate from dual@DB5

ERROR at line 1:


ORA-02020: too many database links in use

Now we reached maximum open database link connections.


— View the open database link connection[Need to run this from same session ]

-- The table v$dblink populates data only for the current session,

SQL> select db_link,logged_on,open_cursors from v$dblink;

DB_LINK LOG OPEN_CURSORS
---------------- --- ------------

DB1 YES 0

DB2 YES 0

DB3 YES 0

DB4 YES 0


We can see there are 4 open database link transactions and it is matching the open_links parameter( i.e 4). So quick way to fix is to close these connections.

SQL> alter session close database link DB4;

ERROR:

ORA-02080: database link is in use

Now we are getting an ORA-02080 error. So before closing the database link, we need to either commit/rollback.

SQL> commit;

Commit complete.

SQL> alter session close database link DB4;

Session altered.

SQL> select db_link,logged_on,open_cursors from v$dblink;

SQL> select db_link,logged_on,open_cursors from v$dblink;


DB_LINK LOG OPEN_CURSORS
---------------- --- ------------

DB1 YES 0

DB2 YES 0

DB3 YES 0


SQL> select sysdate from dual@DB5;


SYSDATE
---------
30-JUL-17


Alternative solutions is:

Increase the open_links parameter.


alter system set open_links=8 scope=spfile;

shutdown immediate;

startup


Tuesday, October 31, 2017


Rfs: Possible Network Disconnect With Primary Database' In Standby Alert Log (Doc ID 397014.1)

In this Document

APPLIES TO:Oracle Database - Enterprise Edition - Version 9.0.1.0 to 12.1.0.2 [Release 9.0.1 to 12.1]
Information in this document applies to any platform.
***Checked for relevance on 31-AUG-2012***
***Checked for relevance on 8-Jul-2015***


SYMPTOMS

Standby alert log reports fallowing errors:

RFS: Possible network disconnect with primary database
Standby database ID mismatch [0xAAAA:0xBBBBB]

Archive log transfer/apply to this standby database works fine.

CAUSE

The (error) message may be triggered by another database that has log_archive_dest_X pointing to standby instance of (error) message .

The RFS process tries to communicate with the instance.
SOLUTION

Check if you have DB with mismatched database ID and its log_archive_dest_X parameter value.

If found a database, which is not included in the current in primary/standby configuration, disable log_archive_dest_2 to the instance:

ie:

From the error message of "Standby database ID mismatch [0xAAAA:0xBBBBB]"

Convert the hex number of first argument, 0xAAAA to decimal value using calculator

Then search db with the dbid.


SQL> select dbid from v$database;

SQL> alter system set log_archive_dest_state_x=disable;

Wednesday, October 18, 2017

Offline install of .NET Framework 3.5 in Windows 10 using DISM

Windows 10 comes with .NET framework 4.5 pre-installed, but many apps developed in Vista and Windows 7 era require the .NET framework v3.5 installed along with 4.5. These apps will not run unless you will install the required version. When you try to run any such app, Windows 10 will prompt you to download and install .NET framework 3.5 from the Internet. However, this will take a lot of time. You can save your time and install .NET Framework 3.5 from the Windows 10 installation media. This method is much faster and does not even require an Internet connection. Here is how to install it.

To install .NET Framework 3.5 in Windows 10, do the following:
  1. Insert your Windows 10 DVD, or double click its ISO image, or insert your bootable flash drive with Windows 10, depending on what you have.
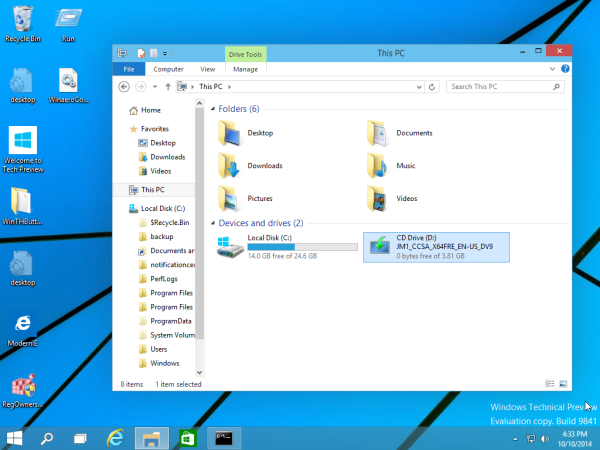
  2. Open 'This PC' in File Explorer and note the drive letter of the installation media you have inserted. In my case it is disk D:
    installation media drive d
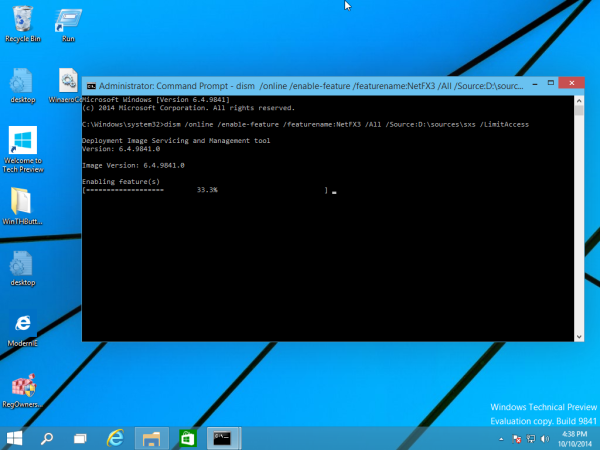
  3. Now open an elevated command prompt and type the following command:
    Dism /online /enable-feature /featurename:NetFX3 /All /Source:D:\sources\sxs /LimitAccess
    Replace D: with your drive letter for Windows 10 installation media.
    dism
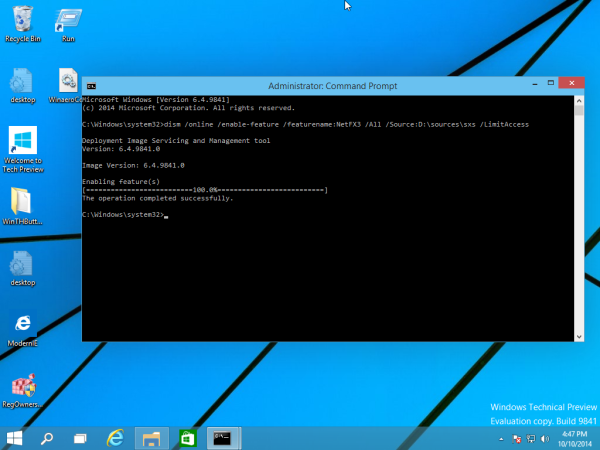
You are done! This will install .NET framework 3.5 in Windows 10.
net installed seccessfully
To save your time, I have prepared a simple batch file which will save your time and will find the inserted installation media automatically. It looks like this:
@echo off
Title .NET Framework 3.5 Offline Installer
for %%I in (D E F G H I J K L M N O P Q R S T U V W X Y Z) do if exist "%%I:\\sources\install.wim" set setupdrv=%%I
if defined setupdrv (
echo Found drive %setupdrv%
echo Installing .NET Framework 3.5...
Dism /online /enable-feature /featurename:NetFX3 /All /Source:%setupdrv%:\sources\sxs /LimitAccess
echo.
echo .NET Framework 3.5 should be installed
echo.
) else (
echo No installation media found!
echo Insert DVD or USB flash drive and run this file once again. 
echo.
)
pause
Download the file, extract it from the ZIP archive to the Desktop, right click it and choose Run as administrator. The file will install .NET Framework 3.5 automatically after finding the drive letter of your Windows 10 installation media.
run as administrator
Click here to download the batch file.

Monday, October 9, 2017


How To Run Diagnostic: Apps Check (OMCHECK) From A Financials Responsibility? (Doc ID 460813.1)
R11i/12: GL/AP/FA/AR/PM: 

GOAL

This diagnostic is used to locate the current versions of files you have running on your system.  This document will show you how to setup the Diagnostic: Apps Check (OMCHECK) request to be available in a Financials Responsibility.

SOLUTION

In order to be able to see and use Diagnostic: Apps Check from a Financials Responsibility (like FA, GL, AR, AP, PN, and so on) the following steps need to be performed:
1.  Responsibility:  System Administrator responsibility and go to Request Groups form:
Navigation:  Security > Responsibility > Request


2.  Query for Application: Application Name and Group: All Reports and Programs.
Application Name can be one of the following:  Assets, General Ledger, Receivables, Payables, Property Manager and so on.

3.  Add a new Program under Requests title and enter Diagnostics: Apps Check for the desired Name


4. Save work


Tuesday, October 3, 2017


ORA-00020: maximum number of processes (500) exceeded


How to increase PROCESSES initialization parameter:

1. Login as sysdba
sqlplus / as sysdba

or

sqlplus /nolog

SQL*Plus: Release 11.2.0.3.0 Production on Wed Oct 4 11:32:29 2017
Copyright (c) 1982, 2011, Oracle. All rights reserved.

SQL> connect sys/oracle as sysdba

Connected.

2. Check Current Setting of Parameters
sql> show parameter sessions
sql> show parameter processes
sql> show parameter transactions

3. If you are planning to increase "PROCESSES" parameter you should also plan to increase "sessions and "transactions" parameters
A basic formula for determining these parameter values is as follows:

processes=x
sessions=x*1.1+5
transactions=sessions*1.1

4. These paramters can't be modified in memory. You have to modify the spfile only (scope=spfile) and bounce the instance.
sql> alter system set processes=500 scope=spfile;
sql> alter system set sessions=555 scope=spfile;
sql> alter system set transactions=610 scope=spfile;
sql> shutdown abort
sql> startup

Thursday, September 28, 2017

Oracle / PLSQL: TO_DATE Function

This Oracle tutorial explains how to use the Oracle/PLSQL TO_DATE function with syntax and examples.

Description

The Oracle/PLSQL TO_DATE function converts a string to a date.

Syntax

The syntax for the TO_DATE function in Oracle/PLSQL is:
TO_DATE( string1 [, format_mask] [, nls_language] )

Parameters or Arguments

string1
The string that will be converted to a date.
format_mask
Optional. This is the format that will be used to convert string1 to a date. It can be one or a combination of the following values:
ParameterExplanation
YEARYear, spelled out
YYYY4-digit year
YYY
YY
Y
Last 3, 2, or 1 digit(s) of year.
IYY
IY
I
Last 3, 2, or 1 digit(s) of ISO year.
IYYY4-digit year based on the ISO standard
RRRRAccepts a 2-digit year and returns a 4-digit year.
A value between 0-49 will return a 20xx year.
A value between 50-99 will return a 19xx year.
QQuarter of year (1, 2, 3, 4; JAN-MAR = 1).
MMMonth (01-12; JAN = 01).
MONAbbreviated name of month.
MONTHName of month, padded with blanks to length of 9 characters.
RMRoman numeral month (I-XII; JAN = I).
WWWeek of year (1-53) where week 1 starts on the first day of the year and continues to the seventh day of the year.
WWeek of month (1-5) where week 1 starts on the first day of the month and ends on the seventh.
IWWeek of year (1-52 or 1-53) based on the ISO standard.
DDay of week (1-7).
DAYName of day.
DDDay of month (1-31).
DDDDay of year (1-366).
DYAbbreviated name of day.
JJulian day; the number of days since January 1, 4712 BC.
HHHour of day (1-12).
HH12Hour of day (1-12).
HH24Hour of day (0-23).
MIMinute (0-59).
SSSecond (0-59).
SSSSSSeconds past midnight (0-86399).
AM, A.M., PM, or P.M.Meridian indicator
AD or A.DAD indicator
BC or B.C.BC indicator
TZDDaylight savings information. For example, 'PST'
TZHTime zone hour.
TZMTime zone minute.
TZRTime zone region.
nls_language
Optional. This is the nls language used to convert string1 to a date.

Returns

The TO_DATE function returns a date value.

Applies To

The TO_DATE function can be used in the following versions of Oracle/PLSQL:
  • Oracle 12c, Oracle 11g, Oracle 10g, Oracle 9i, Oracle 8i

Example

Let's look at some Oracle TO_DATE function examples and explore how to use the TO_DATE function in Oracle/PLSQL.
For example:
TO_DATE('2003/07/09', 'yyyy/mm/dd')
Result: date value of July 9, 2003

TO_DATE('070903', 'MMDDYY')
Result: date value of July 9, 2003

TO_DATE('20020315', 'yyyymmdd')
Result: date value of Mar 15, 2002
You could use the TO_DATE function with the dual table as follows:
SELECT TO_DATE('2015/05/15 8:30:25', 'YYYY/MM/DD HH:MI:SS')
FROM dual;
This would convert the string value of 2015/05/15 8:30:25 to a date value

Tuesday, September 26, 2017


telnet: connect to address 10.1.150.139: Connection refused

[root@ve ~]#  netstat -tulpn | grep 1521
[root@ve ~]#  ps aux | grep oracle

sqlplus / as sysdba
startup
lsnrctl start listener

[root@ve2 ~]# netstat -tuplen
Active Internet connections (only servers)
Proto Recv-Q Send-Q Local Address               Foreign Address             State       User       Inode      PID/Program name
tcp        0      0 0.0.0.0:111                 0.0.0.0:*                   LISTEN      0          10168      1641/rpcbind
tcp        0      0 0.0.0.0:37779               0.0.0.0:*                   LISTEN      29         1931       1685/rpc.statd
tcp        0      0 0.0.0.0:22                  0.0.0.0:*                   LISTEN      0          10766      1859/sshd
tcp        0      0 127.0.0.1:631               0.0.0.0:*                   LISTEN      0          11715      1740/cupsd
tcp        0      0 127.0.0.1:25                0.0.0.0:*                   LISTEN      0          10825      1939/master
tcp        0      0 :::37382                    :::*                        LISTEN      1500       22646      6882/ora_d000_dbtes
tcp        0      0 :::111                      :::*                        LISTEN      0          10173      1641/rpcbind
tcp        0      0 :::1521                     :::*                        LISTEN      1500       21481      6952/tnslsnr
tcp        0      0 :::23602                    :::*                        LISTEN      29         1939       1685/rpc.statd
tcp        0      0 :::22                       :::*                        LISTEN      0          10768      1859/sshd
tcp        0      0 ::1:631                     :::*                        LISTEN      0          11714      1740/cupsd
tcp        0      0 ::1:25                      :::*                        LISTEN      0          10827      1939/master
udp        0      0 0.0.0.0:111                 0.0.0.0:*                               0          10165      1641/rpcbind
udp        0      0 0.0.0.0:24700               0.0.0.0:*                               29         1927       1685/rpc.statd
udp        0      0 0.0.0.0:631                 0.0.0.0:*                               0          11717      1740/cupsd
udp        0      0 0.0.0.0:968                 0.0.0.0:*                               0          10167      1641/rpcbind
udp        0      0 0.0.0.0:1013                0.0.0.0:*                               0          1921       1685/rpc.statd
udp        0      0 :::9648                     :::*                                    29         1935       1685/rpc.statd
udp        0      0 ::1:61374                   :::*                                    1500       22641      6882/ora_d000_dbtes
udp        0      0 ::1:14353                   :::*                                    1500       22586      6850/ora_pmon_dbtes
udp        0      0 :::111                      :::*                                    0          10170      1641/rpcbind
udp        0      0 :::47502                    :::*                                    1500       21758      6878/ora_mmon_dbtes
udp        0      0 ::1:23356                   :::*                                    1500       21664      6884/ora_s000_dbtes
udp        0      0 :::968                      :::*                                    0          10172      1641/rpcbind

Thursday, September 21, 2017


Increase JAVA heap size in Oracle Application (EBS) 12.2.5


select developer_parameters from  fnd_cp_services
WHERE service_id = (SELECT manager_type
FROM fnd_concurrent_queues
WHERE concurrent_queue_name = 'FNDCPOPP');

You simply increase the value.


   UPDATE fnd_cp_services SET developer_parameters =
'J:oracle.apps.fnd.cp.gsf.GSMServiceController:-mx4096m'
WHERE service_id = (SELECT manager_type
FROM fnd_concurrent_queues
WHERE concurrent_queue_name = 'FNDCPOPP');


Commit;
To BottomTo Bottom

R12.0.6+ :  ORACLE RECEIVABLES (AR): RECEIPT DATA SETUP DIAGNOSTIC TEST

To execute the test, do the following:
  1. Start Oracle E-Business Suite
  2. Connect to responsibility Application Diagnostics
  3. Select the Diagnose menu option
  4. Click button Select Application and select Application "Oracle Receivables"
  5. Scroll down to group "Receipts"
  6. Select test name "Receipt Data"
  7. Input Parameters (* required)
      Responsibility ID  
      Cash Receipt Id  
      Include GL Tables  

Friday, September 8, 2017


AC-00005: No write permissions for creating the Context file – /tmp/temp.xml


Problem :

While making Oracle Application Clone :

Target System Root Service [enabled] :

Target System Web Entry Point Services [enabled] :

Target System Web Application Services [enabled] :

Target System Batch Processing Services [enabled] :

Target System Other Services [disabled] :

Do you want to preserve the Display [hooraps1:0.0] (y/n) ? : n

Target System Display [erp2:0.0] :
RC-50004: Error occurred in CloneContext:
AC-00005: No write permissions for creating the Context file – /tmp/temp.xml
Raised by oracle.apps.ad.context.AppsContext
Check Clone Context logfile /u07/appprod/apps/apps_st/comn/clone/bin/CloneContext_0908103640.log for details.

ERROR: Context creation not completed successfully.
For additional details review the file /tmp/adcfgclone_17325.err if present.

When you check log file you will get this :

StackTrace:
java.lang.Exception: AC-00005: No write permissions for creating the Context file – /tmp/temp.xml
Raised by oracle.apps.ad.context.AppsContext
at oracle.apps.ad.context.AppsContext.getOaEnabledValues(AppsContext.java:733)
at oracle.apps.ad.context.CloneContext.setConfigHome(CloneContext.java:2306)
at oracle.apps.ad.context.CloneContext.doClone(CloneContext.java:606)
at oracle.apps.ad.context.CloneContext.main(CloneContext.java:5023)

RC-50004: Error occurred in CloneContext:
AC-00005: No write permissions for creating the Context file – /tmp/temp.xml
Raised by oracle.apps.ad.context.AppsContext
Context file creation not succesful


Solution :

Simply go to this path by root user /tmp/temp.xml . Give 777 rights to temp.xl .
And now login with application user and run perl adcfgclone.pl appsTier !!

RC-50013 Fatal: Instantiate driver

Error:
Seen the issue during the execution of adcfgclone.
perl adcfgclone.pl dbTechStack
====================
WARNING: [AutoConfig Error Report]
The following report lists errors AutoConfig encountered during each
phase of its execution. Errors are grouped by directory and phase.
The report format is:
<filename> <phase> <return code where appropriate>
[APPLY PHASE]
AutoConfig could not successfully execute the following scripts:
Directory: /EBS/oracle/product/12c/perl/bin/perl -I /EBS/oracle/product/12c/perl/lib/5.14.1 -I /EBS/oracle/product/12c/perl/lib/site_perl/5.14.1 -I /EBS/oracle/product/12c/appsutil/perl /EBS/oracle/product/12c/appsutil/clone
ouicli.pl INSTE8_APPLY 1
AutoConfig is exiting with status 1
WARNING: RC-50013: Fatal: Instantiate driver did not complete successfully.
/EBS/oracle/product/12c/appsutil/driver/regclone.drv
====================
CAUSE:
The script was trying to register the oracle home in inventory but its failing to update it.
SOLUTION:
Please delete existing files under oraInventory folder and retry the adcfgclone.
[oracle@ebsdb01 bin]$ cat /etc/oraInst.loc
inst_group=dba
inventory_loc=/EBS/oracle/product/oraInventory
cd /EBS/oracle/product
rm -rf oraInventory
mkdir oraInventory
Retry :   perl adcfgclone.pl dbTechStack

Wednesday, September 6, 2017


ORA-02062: distributed recovery received DBID


select * from DBA_2PC_PENDING;
select * from DBA_2PC_NEIGHBORS;
select * from sys.pending_trans$;
select * from SYS.PENDING_SESSIONS$;
select * from SYS.PENDING_SUB_SESSIONS$;

SELECT KTUXEUSN, KTUXESLT, KTUXESQN, /* Transaction ID */
KTUXESTA Status,
KTUXECFL Flags
FROM x$ktuxe
WHERE ktuxesta!='INACTIVE'


1. Force committing the transactions in collecting state:
COMMIT FORCE 'transaction_id',commit#;

2. execute DBMS_TRANSACTION.PURGE_LOST_DB_ENTRY('transaction_id');

Transaction ID:
160.15.14218
17.25.695140
22.22.673214


Commit;

Monday, August 28, 2017

Scheduling Workflow Mailer Stop and Start events as good practice

The Workflow Notification Mailer runs on the generic service called Workflow Mailer Service, which in turn uses the Standard workshift, active 24 hours every day. This means the notification mailer runs non-stop.
 Not allowing the mailer to restart periodically may present some issues:
  • The corresponding log file corresponding to the Workflow Mailer Service will grow several gigabytes large and eventually the OS will error due to I/O file handling.
  • Some SMTP servers and IMAP servers used for outbound and inbound processing respectively, have time limits to the sessions connected to them. If the mailer reaches those time limits it will encounter a connection error and will be abnormally brought down.
  • Similarly the same might happen to the session the mailer establishes to retrieve HTML and framework content from the application server. This is less likely though but it has been seen.
  • The size of the INBOX folder in the IMAP server won't get expunged as long as the mailer does not refreshes the session. For a purged INBOX folder it takes the mailer to restart - and for parameter Expunge Inbox on Close to be set to Yes.
In order for the issues above to be minimized, a good practice is to schedule the Mailer to automatically go down and start up periodically, daily preferably. This can be done by using the event schedule feature provided in the Workflow Mailer configuration. This can be done as follows:
First, connect to EBS using the responsibility Workflow Administrator Web Applications and go to Workflow Manager
Then edit the Notification Mailer configuration. Continue going through the train stages until you reach the Schedule Events stage:


In the screen shot above the stopping event is set to happen at 11:50 PM and the starting event at 11:55 PM, and these are set to repeat every using 1440 minutes as the interval. If no interval value is specified the stop/start events are raised just once.


Thursday, August 24, 2017

Oracle 11g: Access Control List and ORA-24247

From a more DBA point of view, I would like to go in more detail in response to Marcel’s blog about APEX web service references and ACL.
With ACL’s, Oracle offers more fine-grained access control for users to access external network resources.
The packages UTL_MAIL, UTL_SMTP, UTL_HTTP, UTL_TCP etc. allow communication beyond the database server to the outside world, but when granted access, all hosts can be accessed. This can be interpreted as a security flaw as no login is required when using UTL_TCP for example. DBA’s are advised to revoke the execute privileges from public on these kind of packages.
Since Oracle 11g, the Access Control List is introduced. You not only can control who has access to these packages by granting, but now you can also control which resources they can call.
For instance, when a user is granted to send emails using UTL_MAIL, you can also control that he/she is only able to send through a specified mail server.
At first this looks like a obstacle (ORA-24247), but since the Voyager worm struck Oracle databases a year ago, it is introduced as an extra security measurement.
I will use the UTL_MAIL package as an example, please scroll to the end of this blog to enable UTL_MAIL as it is disabled by default.

ORA-24247: network access denied by access control list (ACL)

If a user is not allowed to connect to a specific server due to ACL restrictions, the following message will appear: ORA-24247: network access denied by access control list (ACL).
I will walk through the solution by using UTL_MAIL as an example; try to execute the following as SCOTT:
SQL> connect scott/tiger
Connected.
begin
  utl_mail.send(
  sender     => 'scott@tiger.com',
  recipients => 'john@doe.org',
  message    => 'Hello World'
  );
end;
ERROR at line 1:
ORA-24247: network access denied by access control list (ACL)
ORA-06512: at "SYS.UTL_MAIL", line 654
ORA-06512: at "SYS.UTL_MAIL", line 671
ORA-06512: at line 1
This is because the SCOTT does not have the privilege to access the mail/smtp server. So it must be added to the ACL.

ACL: Access Control List

The ACL is created as a file and it’s file name is used as the key in the process of adding and removing privileges.

Create ACL and privileges

Now first create an ACL as SYS (or any other user with DBMS_NETWORK_ACL_ADMIN execute granted), this will hold the privileges. You can add as many privileges as you like to this file, but I would recommend to split privileges in the ACL to specific tasks or users. You must create an ACL with at least one privilege, so lets start with the ‘connect’ privilege for user SCOTT, (also a role can be added as principal):
begin
  dbms_network_acl_admin.create_acl (
    acl         => 'utl_mail.xml',
    description => 'Allow mail to be send',
    principal   => 'SCOTT',
    is_grant    => TRUE,
    privilege   => 'connect'
    );
    commit;
end;

Add Privilege

Great, now that the ACL is created, you can add more privileges like the ‘resolve’ privilege:
begin
  dbms_network_acl_admin.add_privilege (
  acl       => 'utl_mail.xml',
  principal => 'SCOTT',
  is_grant  => TRUE,
  privilege => 'resolve'
  );
  commit;
end;

Assign ACL

Cool, you granted SCOTT to connect and resolve, but you have not defined to which resources he is allowed to connect:
begin
  dbms_network_acl_admin.assign_acl(
  acl  => 'utl_mail.xml',
  host => 'smtp server host name or address'
  );
  commit;
end;

Try again

SQL> connect scott/tiger
Connected.
begin
  utl_mail.send(
  sender     => 'scott@tiger.com',
  recipients => 'john@doe.org',
  message    => 'Hello World'
  );
  commit;
end;
PL/SQL procedure successfully completed.

Access to websites and ports

The ACL also allows you to control begin and end ports, begin and end dates.
Run as SCOTT:
SQL> select utl_http.request('http://www.tiger.com') from dual;
select utl_http.request('http://www.tiger.com') from dual
       *
ERROR at line 1:
ORA-29273: HTTP request failed
ORA-06512: at "SYS.UTL_HTTP", line 1722
ORA-24247: network access denied by access control list (ACL)
ORA-06512: at line 1

Solution Create ACL, add privileges and assign the ACL with ports

Run as SYS:
begin
  dbms_network_acl_admin.create_acl (
    acl         => 'utl_http.xml',
    description => 'HTTP Access',
    principal   => 'SCOTT',
    is_grant    => TRUE,
    privilege   => 'connect',
    start_date  => null,
    end_date    => null
  );
  dbms_network_acl_admin.add_privilege (
    acl        => 'utl_http.xml',
    principal  => 'SCOTT',
    is_grant   => TRUE,
    privilege  => 'resolve',
    start_date => null,
    end_date   => null
  );
  dbms_network_acl_admin.assign_acl (
    acl        => 'utl_http.xml',
    host       => 'www.tiger.com',
    lower_port => 80,
    upper_port => 80
  );
  commit;
end;
The hosts parameter in dbms_network_acl_admin.assign_acl, can also contain wild cards like ‘*.tiger.com’ or even ‘*’.

Try again

Run as SCOTT:
SQL> select utl_http.request('http://www.tiger.com') from dual;
UTL_HTTP.REQUEST('HTTP://WWW.TIGER.COM')
----------------------------------------
[result here]
Now try to access the same URL, but with another port. You will see this fails, because only port 80 is privileged.
SQL> select utl_http.request('http://www.tiger.com:1234') from dual;
select utl_http.request('http://www.tiger.com:1234') from dual
       *
ERROR at line 1:
ORA-29273: HTTP request failed
ORA-06512: at "SYS.UTL_HTTP", line 1722
ORA-24247: network access denied by access control list (ACL)
ORA-06512: at line 1
You can specify lower and upper ports like a range when assigning ACL’s.

dba_network_acls

You can view ACL’s and privileges by querying dba_network_acls.
select host, lower_port, upper_port, acl
  from dba_network_acls
  where ACL='/sys/acls/'utl_http.xml';

Removing ACL and priviliges

Of course , removing ACL’s and privileges is also possible and  self explainable.
Run the following as SYS:

Unassign ACL

begin
  dbms_network_acl_admin.unassign_acl(
    acl        => 'utl_http.xml',
    host       => 'www.tiger.com',
    lower_port => 80,
    upper_port => 80
  );
end;

Delete Privilege

begin
  dbms_network_acl_admin.delete_privilege(
    'utl_http.xml', 'SCOTT', NULL, 'connect'
  );
end;

Drop ACL

begin
  dbms_network_acl_admin.drop_acl(
    'utl_http.xml'
  );
end;

Enabling UTL_MAIL

In these examples I use UTL_MAIL, this package is disabled by default, run the following statements as SYS to enable it:
SQL> @?/rdbms/admin/utlmail.sql
SQL> @?/rdbms/admin/prvtmail.plb
SQL> alter system set smtp_out_server = '<smtp host>' scope=spfile;
SQL> shutdown immediate
SQL> startup

  RMAN-20207: UNTIL TIME or RECOVERY WINDOW is before RESETLOGS time https://shivanandarao-oracle.com/2012/12/05/rman-20207-until-time-or-re...